Thinning shears 46-tooth/serrated (Millers Forge-Gold 7 1/2″, NOT economy or another brand)
Toenail clippers, Dremel tool, or Oster nail grinder
Grooming table
Cool drying blow dryer
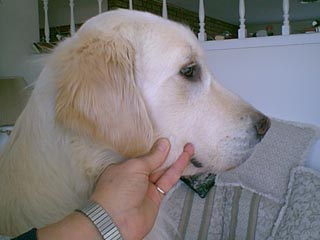
BEFORE: This is a relatively ungroomed ear. See the fine fuzzy stuff on the top (or base of the ear), as well as the long straggly fluff behind the ear.
Preparation
Start with a clean and dry dog that’s thoroughly brushed. For show grooming, I prefer trimming before bathing, then doing any touch-up work after the bath and blow drying.
About Blow Drying
If you wonder how those show dogs get those nice straight coats, it is from the blow drying. If you cannot afford a blow dryer, it is considerably more difficult to straighten a wavy coat, but it can be done by pinning towels snugly around the dog while they are still dampish. The blow dryer also comes in handy during wet weather, after trips to the beach and yes, even “blowing” away all of that coat when the dog is shedding!
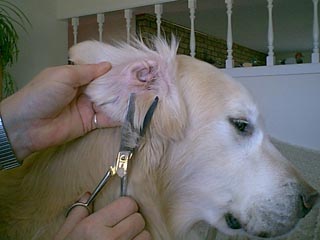
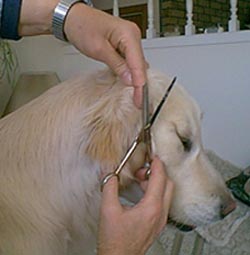
Hold the ear forward & out of the way while doing this.
Hold thinning shears vertically as shown, and get the blades under the fuzzy stuff fairly close to the skin.
Make about 3 cuts with the blades, then stop, brush out and look.
This will probably need repeated several times, but don’t totally remove the hair, just thin it, & trim the straggly stuff so it will lay down nicely on the neck.
Step 1
Step 2
Trim with thinning shears from the starting point shown, toward the face. On most dogs, not much is needed here.
Do not trim the inside of the ear flap totally smooth and short or it will create a very “hard look.” The exception would be with extremely heavily coated ears (inside & out), which usually means heavier or thicker ear leather as well. In that case, the inside of the ear flap can be thinned quite well.
Step 2
Step 3
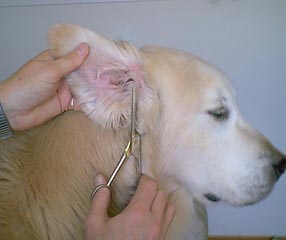
Trim the hair in front of the base of the ear; using the same method with the thinning shears; thin, brush, look, repeat.
The hair immediately around the ear opening should be trimmed close, or plucked with forceps, taking care not to have bits of hair fall inside the ear canal.
The hair under the fulcrum of the scissors in this picture, actually on the dogs neck, should also be thinned in this way from about 2″ below the ear, up to the base of the ear.
Step 3
Step 4
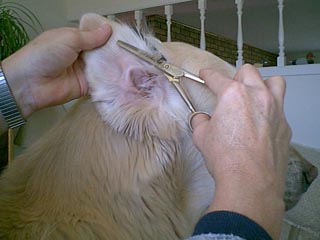
Unless the dog has very heavily coated ears inside, only make one “light” stroke with the thinning shears here, at most one stroke this direction, and one stroke close to the skin under the coat going the opposite direction (towards the nose).
Step 4
Step 5
Notice, by looking at the ear, the hair naturally grows longer at the top, and shorter towards the tip. When trimming the hair, we want to neaten and shorten, but in essence keep the “natural effect”.
Take too much off, and again it will change the “soft” facial expression to a very unbecoming “hard” look. Notice the angle that the thinning shears are being held in relation to the long hair on top of the ear held between my fingers.
The thinning shears are held so the cut will be shorter at the tip of the ear (lower hand), and longer at the top of ear (the actual base of ear).
Step 5
Step 6
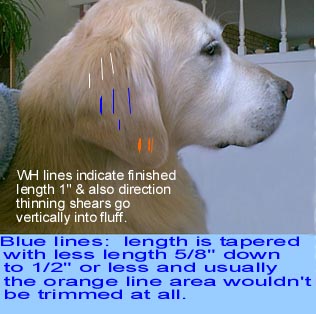
The white, blue, and orange markers in the photo direct the approximate lengths that the hair on the front of the ear is trimmed. As a beginner, do this trimming in small increments over a period of several days, in which time you have the opportunity to look at your progress, without having “butchered” the dog.
First, use the thinning shears underneath the longer hair on the top 3rd of the ear, close to the skin, and make a couple of strokes with the thinning shears vertically across the width of the ear, and comb.
Second, trim the length of the hair on the ear with the thinning shears as in the picture above, but do so only about 1/4″ (or less) at a time. Comb out, look, then do a little more.
This is the most critical part of grooming the ear, so work slowly, stop, and look at it for a day, then do a little more if necessary.
Step 6
Step 7
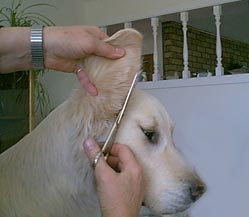
Trim the outside edge of the ear with quick repetitive cuts with the thinning shears, all around the ear, from the position shown, around the tip and up to about my thumb on top hand in photo, and don’t go any farther up the inside front of the ear.
Holding the ear out and away from dogs head do the same with the hair from the fulcrum of the shears (left in this photo) and just above the thumb of hand holding shears.
Step 7
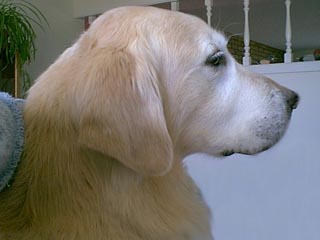
After
A “neatened”, natural looking ear.
Note: The few long curls that run the length of the front rim of the ear, take very little thinning and trimming. If this is cut short, the soft expression will be spoiled.
This specific problem is not shown in picture form: I use the thinning shears close to the skin, going vertically up under these hairs, and trim ONE stroke or thinning cut only. Comb or brush it out, and don’t be surprised that you didn’t take much out, that is what we want!
Then, brush or comb these “decorative face framing hairs” straight out from the ear, and angle the thinning shears so as to trim closer (shorter) at the tip of the ear and yet leave these hairs longer at the top or base of the ear by the eye, just as it grows naturally. These decorative hairs will lay down and look neat with very little trouble.